Saturday, July 26, 2014

Water Loss During Processing

Q. Why do my jars lose liquid during processing?
A. There are several reasons that will cause water loss during processing.

You packed your jars to tightly or overfilled them.  Don't shake down your jars.  Food needs room to expand during the canning process.  Make sure you leave the correct head space.

You did not exhaust your canner for the right amount of time

Your pressure regulator on the weighted gage canner rocked to vigorously.  Always maintain a slow, steady rocking motion.

If your heat source was unsteady or you had a steam leakage it may have caused a fluctuation of pressure during canning.

You should never try to speed up the cooling down time.  Let it drop on it own.  Bumping the regulator will cause water loss in your jars.

Uneven temperature changes is another culprit that causes water loss. You should always wait 10 minutes after pressure has dropped before removing jars from canner.

Your  lids may not have been adjusted on the jars properly.

If all canning procedures have been followed and the lids have sealed, the food is safe to store and eat. However, because liquid was lost during canning, food above the liquid line may discolor during storage. Plan to use these jars first.

Monday, July 21, 2014

Cherry Pie Filling


Rinse and pit fresh cherries and place in cold water with a little ascorbic acid add to prevent browning.


You can use frozen cherries if you want but make sure you thaw them completely and drain well.

Bring a pot of water to a boil.  Add your cherries about 6 cups at a time. Using a slotted spoon place your fruit in a bowl and keep it covered.  Repeat until all fruit is heated.


Quantities of Ingredients Needed For
1 Quart7 Quarts
Fresh Cherries3-1/3 cups6 quarts
Granulated sugar1 cup7 cups
Clear Jel1/4 cup + 1 tbsp1-3/4 cups
Cold water1-1/3 cups9-1/3 cups
Bottled Lemon Juice1 tbsp + 1 tsp1/2 cup
Cinnamon (optional)1/8 tsp1 tsp
Vanilla or Almond Extract1/4 tsp2 tsp
Red food coloring (optional)6 drops1/4 tsp

Combine sugar, clear jel and cinnamon in a stainless steel pot.  


Mix together and add your water, vanilla and food coloring if using.  Heat over medium heat until mixture thickens and begins to bubble.

  Add your lemon juice and boil for one minute.  Stir Constantly to prevent sticking.


Fold your drained cherries into the filling. 


Fill your jars leaving one inch head space. 


 Remove air bubbles as you fill your jars by gently pressing down on your filling.  

Wipe rims of jars with a paper towel dipped in vinegar.  Place lids and rings on jars and tighten down finger tight.


Process both pints and quarts in a boiling water bath for 30 minutes.

Turn off heat, Remove lid and wait 5 minutes before removing jars from canner.

Place jars on counter to cool for 24 hours.


Wash jars.  Label and Store in a cool dark room.

Thursday, July 3, 2014

Virginia Sweet Chunk Pickles

 Sweet Chunk Pickles from Kat's Kitchen
I would like to take the credit for this delicious pickle, but it has been made by grandma's for generations from the east coast to the west.  I simply have the pleasure of sharing it with you.  
I hope you enjoy them as much as I do!


Ingredients:

  • 75 pickling cucumbers 4 to 5 inches long or use 2 gallons of small cukes. (You can use just about any kind of cucumber, but pickling cukes work better)
  • Brine (the proportion is 1 gallon of water and 2 cups of salt) You need to make enough to cover your cucumbers. (I used 2 gallons of water and 4 cups of salt)
  • 3 tablespoons of powdered alum
  • 6 cups of white vinegar
  • 8 cups of sugar
  • 1/3 cup of pickling spice
  • 1 tbsp of celery seed
You can use as many or as few cucumbers as you have but if you use more your will need to make more syrup during that step to cover all your pickles.  

The first thing you want to do is mix 4 cups of salt with 2 gallon of water and put it on to start boiling.  Or just make sure you make enough to cover the amount of pickles you are making.

Next, wash your cucumbers under running water using a gentle scrub brush.

As you scrub put them over into your crock or any large pot if you don't have a crock.  I use my water bath canner to do mine in.

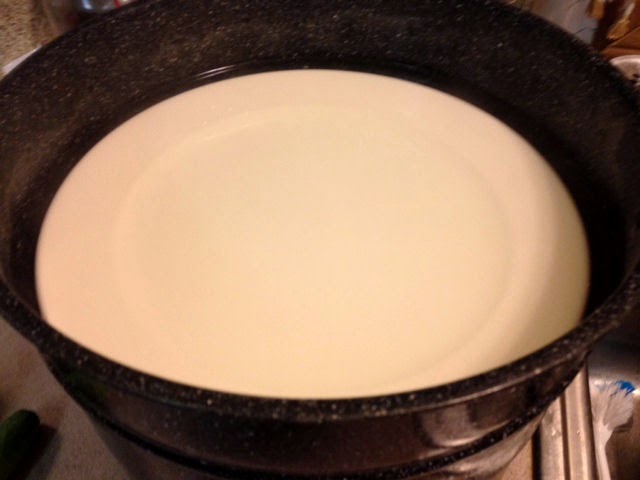
Once your brine comes to a full rolling boil, pour it over the cucumbers.  Use a plate to hold the cucumbers under the brine.  I am lucky enough to have a large plate that fits perfectly in my canner.  You can fill a canning jar with water if you need something to hold the plate down.

Let them stand like this for one week.  If it is hot weather you should check it every day and skim off any scum that might form.  

On day 7 you drain the brine off your cucumbers.  


Rinse well, cut the ends off and cut into chunks. Put back in crock or pot and continue to the next step.
I left a few of the small ones whole.  


You will do this next step over the next 3 days

Mix one gallon of water to 1 tbsp of powdered alum and bring to a boil. Pour over your pickles.
Put plate back in pot to hold them under the brine.


The next day, drain and repeat this step
The third day, drain and repeat one more time.

On the 4th morning 
Drain and discard the alum water.  

Rinse pickles well several times in fresh water.

Mix 6 cups of vinegar to 5 cups of sugar, heat this up and add 1/3 cup pickling spices and 1 tbsp of celery seed.  Bring this to a boiling point and pour over your pickles.


On the 5th morning

Drain this liquid off into a clean pot and add 2 more cups of sugar to it.  Heat it again to the boiling point and pour back over your pickles.

On the 6th morning

Drain your liquid one more time into a clean pot and add 1 cup of sugar and heat once again to the boiling point. 

Pack your pickles into jars leaving 1/2  inch head space.  Cover with your hot liquid and remove air bubbles.  Adjust head space if needed by adding more liquid.


Put on lids and rings.  Tighten down finger tight and process in a boiling water bath for 5 minutes.  

Place jars on counter to cool for 24 hours


Remove rings, Wash Jars, Label and Store in a cool dark room.


Wednesday, July 2, 2014

Apple Pie Filling from Kat's Kitchen


Apple Pie in the oven makes a home smell like the holidays.  It's so easy to make and fun to eat.

I don't know which part I liked better, the crust or the apples. I have never been able to master crimping my crust just right, but it sure didn't hurt the taste any!!

You can never have too much Apple Pie Filling in the pantry.  It's great on a cold winter day and usually apples are very plentiful.  If you don't have an apple tree, check with your neighbors.  Most people are always willing to share apples.


This is my hubby's favorite. I have an apple peeler that cores and slices but we like ours a little thicker so I use it to peel and then slice by hand.

Yields 7 quarts
Ingredients:
  • 24 cups of sliced apples
  • 5 1/2 cups of sugar
  • 1 1/2 cup of Clear Jel (I do not use corn starch when canning)
  • 5 cups of pure apple juice (I use my homemade juice but you can use bottled) You can use all water if you want, but I prefer using apple juice.
  • 3/4 cup of lemon juice (If apples aren't real tart, use 1 cup lemon juice)
  • 3 cups of water
  • 1 tbsp plus 1 tsp of Cinnamon
  • 1 tsp of Allspice  (My family doesn't like a lot of nutmeg.  You can use nutmeg if you like it)


Peel and Slice your apples.  You can use fruit fresh or water with lemon juice added if you don't want them to turn brown.  You can use a mixture of apples or all the same kind.  I prefer Granny Smith but I had Golden Delicious and McIntosh.  I ended up using only the Golden Delicious.
Bring a pot of water to a boil and working in small batches add your apples and boil about 1 minute or until heated through. Using a slotted spoon, remove apples to a bowl and cover them.  Do this until all apples are done.

In a large stainless steel pot add your dry ingredients and mix together, then add your apple juice and water.  Using a wire whisk mix it all together.  Bring to a boil over medium high heat and cook until it starts getting thick and bubbly. Stir constantly to avoid sticking. Add your lemon juice and boil one more minute.
Now add your apples and just fold them into the mixture.  Don't mash them.

You are now ready to fill your jars.

Fill your jars about 2/3 full and remove the air bubbles by pressing down gently on your filling, add more apple filling and continue to press down to remove air bubbles until the jar is filled.  Leave a generous 1 inch head-space.
Apple Pie Filling swells some during processing so it's important to leave enough head-space.


Clean the rims of your jars using a paper towel dipped in white vinegar.

Place your lids and rings on jars and tighten down finger tight.

Process in a boiling water bath for 25 minutes.  Turn off heat and wait 5 minutes.

Remove jars from canner and leave on counter to cool for 24 hours.
Check your seals by pressing your thumbs in the center of the lid.
Remove rings from jars.  Wash and Store in a cool pantry.
Don't forget to label your jars.