What you will need:
A good pressure canner. The All American is my favorite. It's heavy duty and does not need a gasget.
The Presto is also a very good canner. Both will hold 7 quart jars or 18 pints.
You will also need some basic canning tools along with the normal kitchen utensils.
All vegetables and low acid foods MUST be pressure canned.
Prepare all food to be canned according to each recipe. Be sure your canner is clean and all seals are in good shape. You should have your pressure gauge checked at your local extention office at the beginning of each canning season. Check all jars for nicks and cracks. You can reuse bands but always use new lids.Only prolonged exposure to high heat can kill bacteria that can cause food poisoning. Water bath canning can't reach a high enough temperature. Water bath canning reaches 212 degrees where a pressure canner will reach 240.
1: Find a good, tested recipe with required time and pressure for processing. Make sure you have everything you need before beginning.
2: Get your canner ready..DO NOT USE A PRESSURE COOKER AS A CANNER. Make sure to put required amount of water in canner and never use without the rack. Put a few tbsp of white vinegar in the water to keep hard water stains off of your jars.
3: Check all jars for nicks and cracks. Place lids & Rings in a pot of simmering water, but not boiling
Update: Ball says lids no longer need to be heated in simmering water. Directions now are to just wash in hot, soapy water and set aside until ready to use. You may still simmer if you choose.
4: I get my jars ready by running them through the dish washer. It will keep them warm until you are ready to fill them. Or you can wash in hot, soapy water, rinse and place in canner to stay hot until ready to fill.
5: Prepare your recipe per instructions and fill jars, making sure to leave correct amount of head space. Use a non-metalic utensil to run around edges to clear air bubbles and add more food if needed.
You can pick up a nice tool for around $3.00.
6: I use a paper towel dipped in white vinegar to wipe the rims of my jars clean before putting on the lids. Put band on and tighten down finger tight. Place jars in your canner.
7: You are almost there...
- Put lid on the canner and lock it down. Turn on the heat.
- When you see steam coming out of the vent pipe, allow it to vent the steam for 10 minutes
- Place your regulator on the vent pipe and wait for pressure to reach 10 pounds or whatever you need for your elevation.
- Adjust your heat to maintain steady pressure and start your timer
- Monitor carefully because if the pressure drops below 10 pounds you will have to start timing again
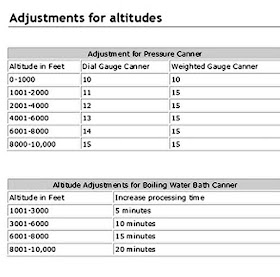
The pressure you use is adjusted according to the altitude where you live. See chart below.
If you have a weighted gauge canner, then you won't have to babysit the dial and it is much easier to get the job done. With a weighted gauge canner, do this:
- Put lid on the canner and lock down
- Turn on heat and watch for steam to start rising from vent pipe
- Allow steam to vent for 10 minutes or whatever your manual says
- Put your weight on the vent pipe for 5, 10 or 15 pounds according to your elevation
- Once the weight starts to jiggle and release steam, start your timer
- Adjust heat until your weight is just rocking very very gently, usually 6 to 8 times per minute
9: Using jar lifter and towel remove jars and place them on a towel on counter top. Do not handle jars again for 24 hours. This allows them to cool and seal properly. After 24 hours, check your lids by pressing thumb gently down in center. If they don't pop back up, you have a good seal. If they did not seal, you should store them in the refrigerator for use in the next few weeks.
10: Label jars with date and and name. This is important since some things like taco sauce, spaghetti sauce look alike, you don't want to get them mixed up and open the wrong one.
11: Store in a cool, dry place away from light.


