Q: I have a tub of lard. (fresh pork lard) Can I freeze it?
A: Yes Donna you can freeze lard and it will keep for a very long time. You can do it in several ways.
1: Simply put it in a plastic container, put on the lid and freeze
2: Melt it, while hot put in canning jars. Put on lids and rings. Let cool and put in freezer.
3: Put solid lard in foodsaver bags. Put a paper towel in top of bag. Seal and freeze.
I would NEVER recommend canning lard. Freezing is the only way I recommend.
Thursday, February 28, 2013
Hamburger Dill Slices
This recipe yields about 7 pints. I don't have any now, so will have to post photos later.
Ingredients:
Appoximately 4 pounds of medium sized cucumbers
6 tbsp of canning salt
4 1/2 cups of water
4 cups of vinegar
14 heads of fresh dill, more or less
3 1/2 tsp of mustard seed
14 peppercorns
Pickle crisp (optional)
1: Cut ends off of the cucumbers and then slice to about 1/4 inch thickness.
2: Combine Vinegar, Water and Salt in a large stainless steel pot and and bring to a boil.
3: Pack cucumbers into jars leaving 1/2 inch headspace. Add 2 heads of dill, 1/2 tsp mustard seed and 2 peppercorns to each jar. If using pickle crisp, add 1/2 tsp to each jar now.
4: Cover in hot brine, leaving 1/2 inch headspace. Remove air bubbles and wipe rims with a damp paper towel.
5: Put on lids and rings and tighten down finger tight.
6: Process in a boiling water bath for 15 minutes. Turn off heat and remove lid. Let stand for 5 minutes. Place jars on counter to cool for 24 hours.
7: Lable and Store in a cool, dark place.
Bread & Butter Pickles
I love Bread & Butter pickles and they are so easy to make. If you don't have all the spices on hand, you can use Mrs. Wages mix, it is really good. If I have large cucumbers left over, I make mine into thicker chunks and I love them. I have listed onions as optional and most people use them, I prefer mine without..

10 Cups sliced cucumbers
4 medium onions (optional)
1/2 cup canning salt
3 cups white vinegar
2 cups granulated sugar
2 tbsp mustard seed
1 tsp celery seed
1 tsp tumeric
For a crisper pickle add 3/4 tsp of pickle crisp to each jar before processing.
Wash your cucumber well and slice off about 1/4 of each end. Slice them as thick as you want your pickles to be.

1: In a large bowl combine cucumbers, onions and salt. Mix well and cover with cold ice water or just pack in ice. Let stand for 2 hours. Transfer to colander and rinse well with cold water.

2: While cukes are soaking get your canner and equipment ready.
3: In a large stainless steele pot combine vinegar, sugar, mustard seed, celery seed and tumeric. Bring to a boil over medium/high heat and heat until sugar is dissolved. Add cukes and bring back to a boil or cold pack them directly into the jars if you prefer. If you cold pack, they will float some, but will stay crisper.
4: Pack into jars leaving a generous 1/2 headspace. Add pickle crisp to each jar.

Cover with hot liquid and remove air bubbles. Adjust headspace. Put on lids and rings. Tighten down finger tight.
5: Process in water bath for 10 minutes. Remove canner lid and wait 5 minutes.
6: Cool and Store
Clear Jel
Q: Can you use Clear-Jel in place of Pectin when making
jam?
A:
I have had a few questions about using Clear Jel in making jams. I want to
assure everyone that you CAN use it instead of pectin. You may have to adjust
your recipes and it may take a few trial and errors to get it right, but Clear
Jel can be used. Here is a link to Washington State University's County
Extension with some good information about it and some recipes.
Wednesday, February 27, 2013
Corncob Jelly
I made a few jars of corncob jelly. It tastes a lot like honey. I got the original recipe from the National Center for home food preservation. I did it a little different from their recipe. I added 2 tbsp. of lemon juice and a pat of butter to reduce the foaming. I also processed for 10 minutes instead of 5. Some recipes I've seen call for putting in food coloring. I don't think you need it.

To make corncob juice:
1 dozen medium-sized fresh corncobs2 quarts water
To Prepare Juice - Wash the corncobs and cut into 4-inch lengths. Place in a large stockpot, add 2 quarts water or enough to cover, and bring to a boil. Reduce heat and boil slowly for 35 to 40 minutes. Strain the juice through a double layer of cheesecloth or a jelly bag. Allow juice to drip through the cloth, using a stand or colander; do not press or squeeze the bag or cloth.
To make jelly: You will need
3 cups corncob juice
1 (1¾ ounce) package powdered pectin
or 6 tbsp. of Ball Classic pectin.
3 cups sugar
2 tbsp. of lemon juice
A pat of butter to reduce foaming
Yield: About 5 or 6 half-pint jars
To Make Jelly - Measure 3 cups of corncob juice into a large sauce pot. Stir in the pectin, butter and lemon juice and bring to a full boil that can't be stirred down. Add the sugar all at once, and bring the mixture back to a full roiling boil while stirring. Boil for exactly 1 minute. Remove from heat; skim off foam quickly. Pour hot jelly immediately into hot, sterile jars, leaving ¼-inch headspace. Wipe rims of jars with a paper towel dipped in vinegar. Put on lids and rings and tighten down finger tight. Process in a Boiling Water Canner.
The table below is what the National Center for Home Food Preservation says to process for. I did mine for 10 minutes.
| Table 1. Recommended process time for Corncob Jelly in a boiling water canner. | ||||
| Process Time at Altitudes of | ||||
| Style of Pack | Jar Size | 0 - 1,000 ft | 1,001 - 6,000 ft | Above 6,000 ft |
| Hot | Half-pints or Pints |
5 min | 10 | 15 |
Wednesday, February 20, 2013
The All American Canner
For those of you lucky enough to have an All American Canner. Here's a few things I have learned using mine.
1: I always use a good brand of olive oil around the rim of the lid to ensure a good seal and I don't end up with a sticky residue that some vegetable oils leave behind.
2: Do not turn on your heat under the canner until after you have your lid on and clamped down. Turning the heat on before you put on the lid causes your wing nuts to get very hot and hard to handle.
3: When putting the lid on the canner, get eye level and make sure it is level on all sides before tightening down your wing nuts.
4: Always tighten your wing nuts on opposite sides of each other and do a little at a time moving around the pot. Doing this keeps your lid level.
5: Once the canner is heated up, make sure to vent the steam for at least 7 minutes.
6: Always hold the lid up to a light and check your vent pipe and make sure you can see through it and it is clear.
7: Never loosen wing nuts until the pressure has dropped to zero and you have removed the pressure regulator.
8: Put a little white vinegar in your water and it will keep water stains off the jars.
Here's a link to a manual in case you need one..
Sunday, February 10, 2013
Pineapple Jelly Made from Scraps
Making Pineapple Jelly is so easy using the cores and scraps from your fresh pineapples. Just follow these simple steps and you're on your way to a great tasting jelly.

Ingredients for Sure Jel
4 cups of pineapple juice made from the scraps
5 1/2 cups of sugar
2 tbsp of lemon juice
1 box of regular pectin
1 thin pat of butter
Yields about 7 half pint jars
Ingredients if use Ball Classic Pectin
6 cups pineapple juice
1/4 cup lemon juice
6 3/4 cups of sugar
8 tbsp of Ball Classic Pectin
1 thin pat of butter
Yields 9 half pint jars
Take all of your pineapple cores and scraps and put them in a large stainless steel pot.

Add just enough water to cover them and bring to a boil. Let them cool and then set in the refrigerator for at least 24 hours. I let mine sit for several days.
When ready to make your jelly, take out and bring back to a boil. Strain juice through a cheese cloth or something similar. I used a metal strainer and a cotten cloth.

Measure out your sugar in a larger bowl and set aside. Mix your pectin with about 1/4 cup of sugar taken from what you already have measured out.
Put juice, butter, lemon juice and pectin in a large pot over medium/high heat and bring to boil that can't be stirred down.
Add your sugar all at once and bring back to a boil. Boil for exactly one minute.
Skim foam if needed and ladle into clean, sterile jars leaving 1/4 inch head space.
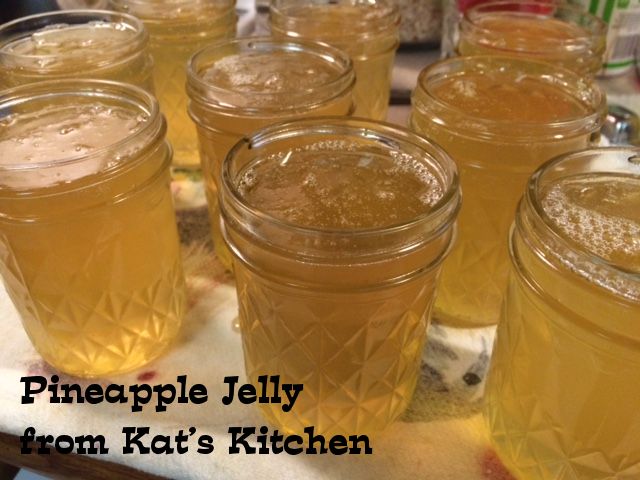

Wipe the rims of your jars with a paper towel dipped in vinegar to make sure you get a good seal. Put on lids and rings and tighten down finger tight.
Place in a boiling water bath and process for 10 minutes.
Remove lid and wait 5 minutes. Place on counter to cool for 24 hours. Label and Store.
Sunday, February 3, 2013
Crushed Pineapple

I found pineapples on sale for $1.99 and thought I would do a few jars of Crushed Pineapple in their own juice. No sugar added..Pineapple upside down cake is one of my family favorites so these will do great for that. Here's how I did them.
You will need:
Fresh Pineapples
Canning Supplies
Cut the top and bottom from your pineapple using a sharp serated knife. Discard these.

Slice the skins from the pineapple staying as close as you can to not waste any of the fruit.

Now you need to cut out any little left over eyes or brown spots. Save these trimmings to make jelly with later.

Cut your pineapple into 4 sections and stand on end to cut out the core. Put core with other trimmings for your jelly.

You should now have a nice bowl of pineapple.

Cut the pineapple into chunks and use a food processor to chop up. Put in a stainless steel pot and simmer for 10 minutes.

Ladle hot pineapple into clean, sterilized jars leaving 1/2 inch headspace. Remove air bubbles and adjust headspace if needed. Put on lids and rings, tighten down finger tight.

Process in a water bath canner.
15 minutes for pints or 1/2 pints
20 minutes for quarts

Remove lid from canner and let set for 5 more minutes. Place on counter to cool for 24 hours. Lable and Store in a cool, dark place.
To make jelly from the trimmings and core. You cover with water and bring to a boil. Let cool and then set in refrigerator for at least 24 hours. Bring back to a boil and strain through a cheese cloth to collect juice for jelly.
Make jelly as usual.
Here's the link for how to make the jelly.
Subscribe to:
Posts (Atom)